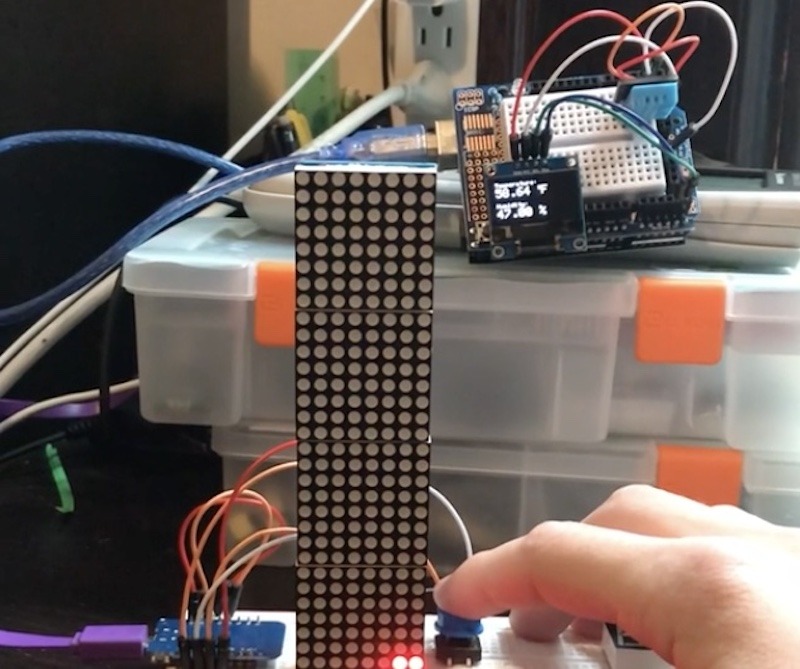
Good designers prioritize the user experience — particularly the experience of users with disabilities that affect their perception and fine motor skills. A young person without disabilities, for example, may feel that jars are easy to open, while an elderly person with reduced hand strength may have the complete opposite experience. To help designers better […]
Good designers prioritize the user experience — particularly the experience of users with disabilities that affect their perception and fine motor skills. A young person without disabilities, for example, may feel that jars are easy to open, while an elderly person with reduced hand strength may have the complete opposite experience. To help designers better understand the experience of people living with disabilities related to hand dexterity, a team of graduate students from Keio University and the University of Maryland developed DexteriSync.
DexteriSync is an exoskeleton-like device worn on the hand. But unlike most exoskeletons, DexteriSync reduces the user’s ability instead of expanding it. It does so via thermal manipulation. If you’ve ever had numb hands following a snowball fight, you know how much the cold can affect your dexterity. In fact, skin temperature is one of the biggest factors related to hand and finger dexterity. By controlling the user’s skin temperature, DexteriSync is able to induce a reduction in dexterity and that could be useful to designers that want to make their products accessible to those living with disabilities.
DexteriSync is able to cool the wearer’s skin by pumping cold water through tubes attached to the 3D-printed exoskeleton frame. Copper contacts on the tubes help to make the thermal transfer more efficient. Peltier coolers remove heat from the pumped water, with an Arduino UNO Rev3 board controlling that process and monitoring the water temperature with a K-type thermocouple paired with a MAX6675 amplifier.
The team performed two user studies to evaluate DexteriSync. The first was intended to test the dexterity of users. The goal of the second was to determine if DexteriSync could affect user thermal perception. Both studies found that DexteriSync did have a noticeable effect.
Wouldn’t it be great if, while playing a virtual reality game, you could feel the heat of a fire on your arm? Or the cold of chilly water? Engineers around the world have been trying to make that happen, but there is a big problem: temperature changes are slow. The immersive effect diminishes when the […]
Wouldn’t it be great if, while playing a virtual reality game, you could feel the heat of a fire on your arm? Or the cold of chilly water? Engineers around the world have been trying to make that happen, but there is a big problem: temperature changes are slow. The immersive effect diminishes when the thermal feedback lags behind the virtual cause. That’s why a team from South Korea’s Gwangju Institute of Science and Technology turned to motors to dramatically speed up the process.
The Flip-Pelt wearable device relies on Peltier elements to create heating and cooling effects, which is a common strategy for thermal feedback. Peltier elements use electricity to produce thermal transfer, heating one side of the element while simultaneously cooling the other side. By placing a Peltier element against the skin, it is possible to create a cooling or heating sensation on demand.
But it takes a long time to reverse the thermal transfer — changing a side of the Peltier element from hot to cold is too slow to be useful for VR thermal feedback. So, the Flip-Pelt prototype doesn’t even bother. Instead, it keeps the Peltier elements going in just one direction and physically swaps the side of the elements that touch the user’s skin.
The prototype Flip-Pelt device contains eight Peltier elements arranged in two rows along the inside of the user’s forearm. Eight servo motors, controlled by an Arduino Nano 33 IoT board, can flip the elements from the cool side to the hot side in response to events in the VR world. The Arduino also controls the Peltier elements themselves through H-bridges, so it can adjust the power going to each.
While this is relatively complex, it does create almost instant changes in perceived temperature.
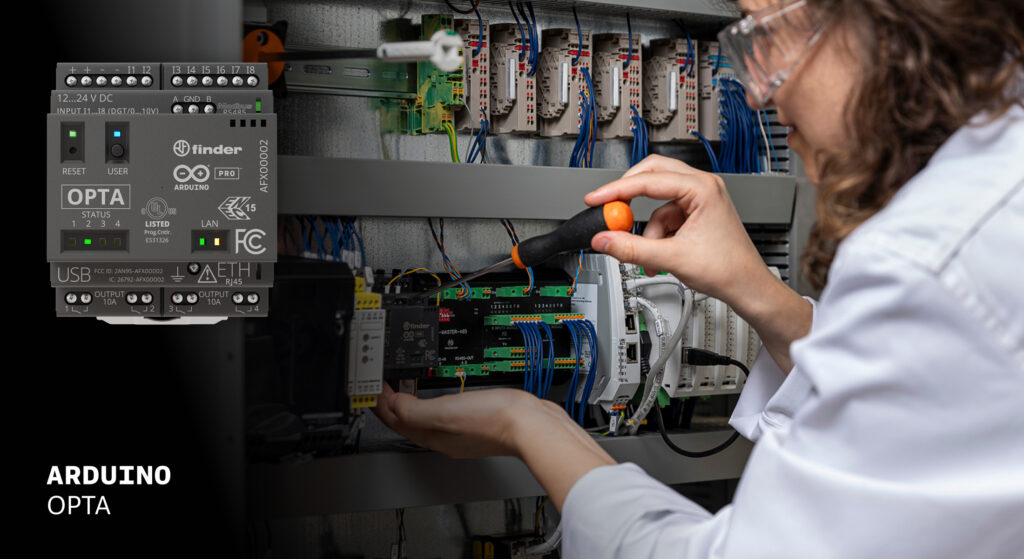
OPC Unified Architecture – OPC UA in short – is a cross-platform, open-source machine-to-machine communication protocol for industrial automation. It was developed by the Open Platform Communications (OPC) Foundation and is defined in detail in the IEC 62541 standard. With the release of the Arduino_OPC_UA library we enable users to convert any product from our […]
OPC Unified Architecture – OPC UA in short – is a cross-platform, open-source machine-to-machine communication protocol for industrial automation. It was developed by the Open Platform Communications (OPC) Foundation and is defined in detail in the IEC 62541 standard.
Step-by-step guide to setting up OPC UA on Arduino Opta
It’s as simple as uploading a single sketch onto your Opta and connecting it to an Ethernet network. Once uploaded, the OPC UA firmware exposes the Arduino Opta’s analog and digital inputs, the user button and LED (only Arduino Opta WiFi), as well as its relay outputs as properties that can be read from or written to using OPC UA. OPC UA communication is performed using OPC UA binary encoding via TCP sockets.
Arduino_OPC_UA is a port of the Fraunhofer open62541 library implementing IEC 62541 in highly portable C99 for both Windows and Linux targets. One serious challenge during the porting of open62541 was to decide on sensible tradeoffs concerning RAM consumption, as using OPC UAs full namespace zero (NS0) requires up to 8 MB of RAM while the STM32H747 powering the Arduino Opta has a total of 1 MB of SRAM to offer – some of which already allocated by the the Arduino framework for the Arduino Opta.
Expand functionality with Arduino Opta Modules and OPC UA integration
Additionally, Arduino_OPC_UA supports the automatic discovery, configuration and exposure as OPC UA objects of the recently released Arduino Opta expansion modules. Currently three different expansion modules exist: Arduino Opta Analog Expansion (A0602), Arduino Opta Digital Expansion with electro-mechanical relay outputs (D1608E), and with solid-state relay outputs (DS1608S). During system start-up, the Arduino Opta’s expansion bus is queried for connected expansion modules and automatically configures them and brings them online for interfacing via OPC UA.
You can extend the default OPC UA server to add additional OPC UA properties such as data collected from a sensor device connected to the Arduino Opta. As a demonstration, we’ve created an example showing how to collect temperature and humidity data from a Modbus RTU device (connected to the Opta’s RS485 port) and subsequently expose this data via OPC UA properties.
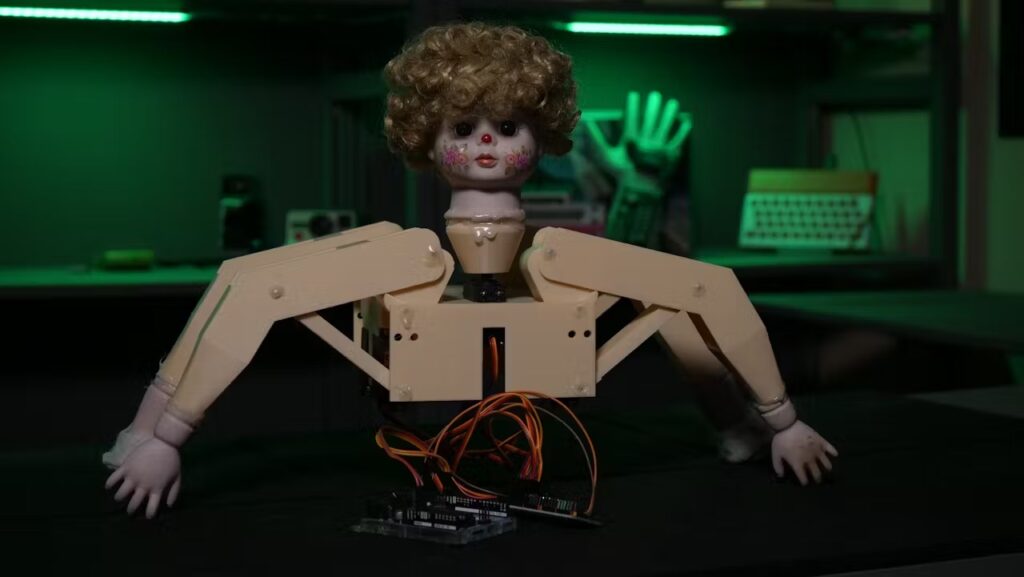
Halloween is popular for a lot of reasons and it is safe to say that “creative expression” is near the top of the list. That extends beyond store-bought costumes and decorations to DIY projects. If you want an excuse to make something impractical, Halloween can provide that. And if you want that thing to move, […]
Halloween is popular for a lot of reasons and it is safe to say that “creative expression” is near the top of the list. That extends beyond store-bought costumes and decorations to DIY projects. If you want an excuse to make something impractical, Halloween can provide that. And if you want that thing to move, an Arduino and Bottango software are there to help, as proven by this disturbing animatronic Halloween doll built by Cameron Coward.
Coward started with a creepy doll procured at a thrift store, putting its porcelain head, hands, and feet onto a 3D-printed skeleton. The skeleton’s arms and legs are four-bar linkages, which produce the unnerving motion that falls into the uncanny valley. In total, there are five servo motors: one for rotating the head and four for actuating the limbs.
An Arduino UNO Rev3 board controls the servo motors through an Adafruit 16-channel PWM servo driver board. That Arduino acts as a hardware driver for Bottango, which is software that was developed specifically for animatronics projects like this one.
Using Bottango, Coward was able to create complex animations that involve all of the servo motors moving simultaneously. A child-size onesie (another thrift store find) covers the skeleton and electronics, completing the illusion of a doll come to life.
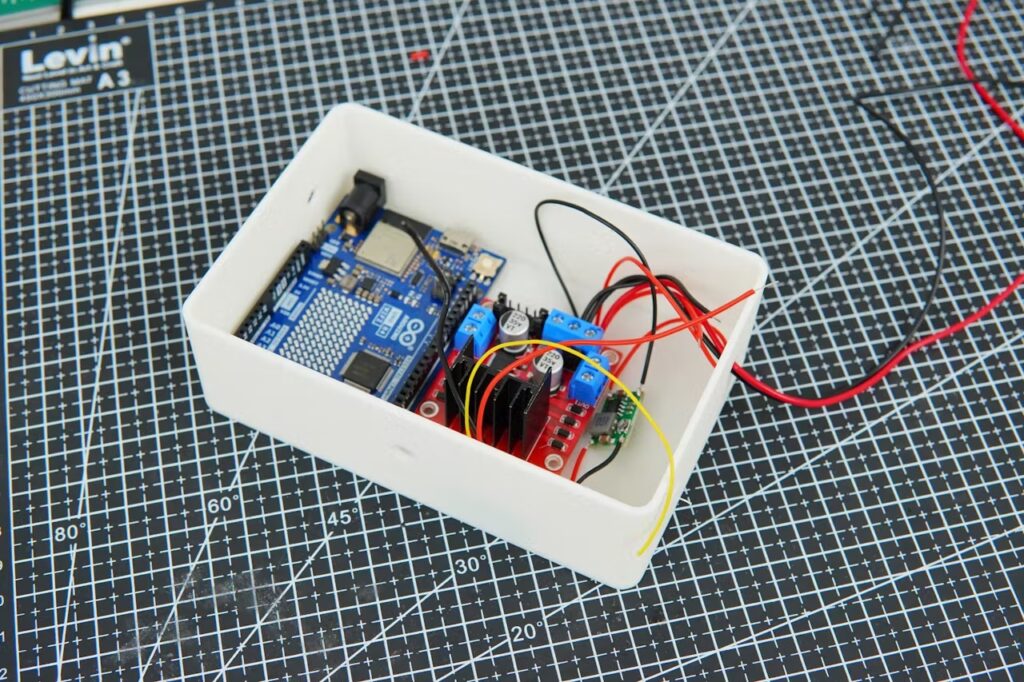
Raising chickens can be a very rewarding endeavor, as they can provide fresh daily eggs and help get rid of pests in the yard. But, like all animals, they require care. Most importantly, you’ll need to ensure that they have regular food and water, and you’ll need to protect them from predators like coyotes, foxes, […]
Raising chickens can be a very rewarding endeavor, as they can provide fresh daily eggs and help get rid of pests in the yard. But, like all animals, they require care. Most importantly, you’ll need to ensure that they have regular food and water, and you’ll need to protect them from predators like coyotes, foxes, and cats. To ease the workload, you may want to consider building Coders Cafe’s DIY smart chicken coop that features AI-based predator detection.
The purpose of a coop, aside from being a comfy place for chickens to roost, is to provide protection from weather and predators. This design is pretty small and is probably only suitable for one or two chickens, but the concepts can be applied to larger coops. It provides a few very useful features: remote or automated feeding, remote or automated door operation, and predator detection with remote notifications. You’ll never have to worry that you forgot to feed the chickens or that you left the door open, and you can respond immediately if you get a notification about a predator.
An Arduino UNO R4 WiFi board oversees those features, operating the door and dispensing food using simple motor-driven mechanisms. A companion app lets the user set an automated door and food schedule, or perform those actions with the tap of the button. A Twilio app integration enables SMS alerts.
The predator-detecting magic works thanks to DFRobot’s HuskyLens AI camera sensor. Users can train that to recognize specific predators and then it will tell the Arduino if it sees one. That communication occurs over I2C and is easy to setup, removing all of the difficulty of implementing AI.
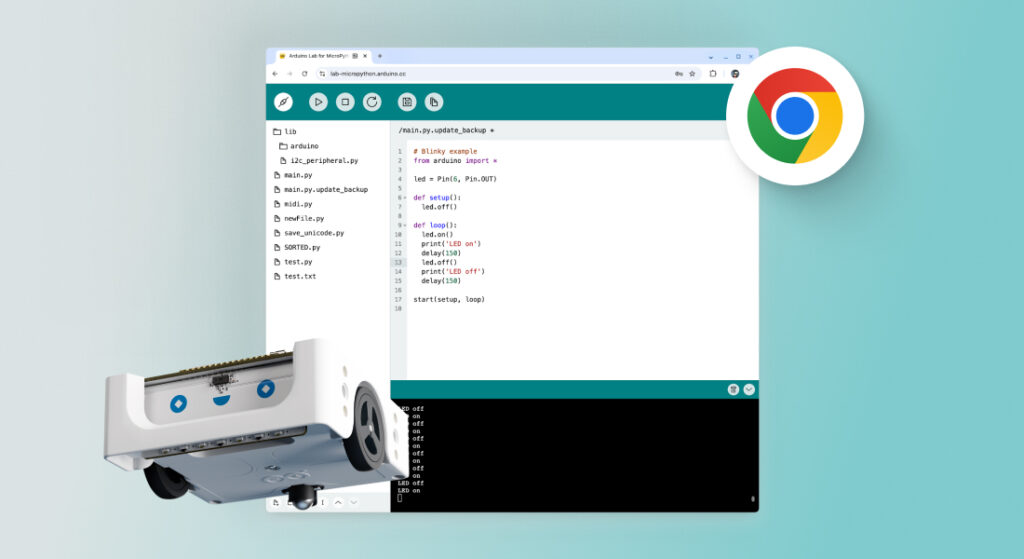
We’re excited to announce the release of the web-based version of the Arduino Lab for MicroPython Editor. This lightweight platform makes it even easier to code with MicroPython using Arduino hardware such as Alvik, Nano ESP32, Nano RP2040 Connect, Nano 33 BLE Sense – and more! You can check the full list of MicroPython-compatible Arduino […]
We’re excited to announce the release of the web-based versionof the Arduino Lab for MicroPython Editor. This lightweight platform makes it even easier to code with MicroPython using Arduino hardware such as Alvik, Nano ESP32, Nano RP2040 Connect, Nano 33 BLE Sense – and more! You can check the full list of MicroPython-compatible Arduino hardware at this link.
What’s more, if you are a Chromebook user, now you can simply edit, run, and save MicroPython code on your board, as well as upload your files (assets or code), directly in the browser (Chrome, Opera, and Edge are supported).
Please note that the editor is still in its “lab” phase, so expect ongoing changes, improvements, and bug fixes of course.
Program Alvik robot with your Chromebook!
The web-based Arduino Lab for MicroPython Editor allows students and teachers using Chromebook to easily program Arduino Alvik in the classroom, expanding the possibilities for them to create more robotics projects. Check out our free online course to start your adventure with Alvik, MicroPython and more!
What is MicroPython?
MicroPython is a lightweight version of Python® designed to run on microcontrollers, allowing you to control hardware like sensors and motors with just a few lines of code. It’s great for beginners because Python® is known for being simple and readable, making it easier to dive into electronics without needing deep programming knowledge.
Plus, since MicroPython works well with Arduino boards, you can take advantage of our incredible open-source community, tutorials, and tools. It’s a perfect fit for exploring hardware projects in a friendly and accessible way!
Ready to give it a try? Test it out now! The web-based Arduino Lab for MicroPython Editor can be accessed from the Resources section in our app.arduino.cc or directly from https://lab-micropython.arduino.cc.
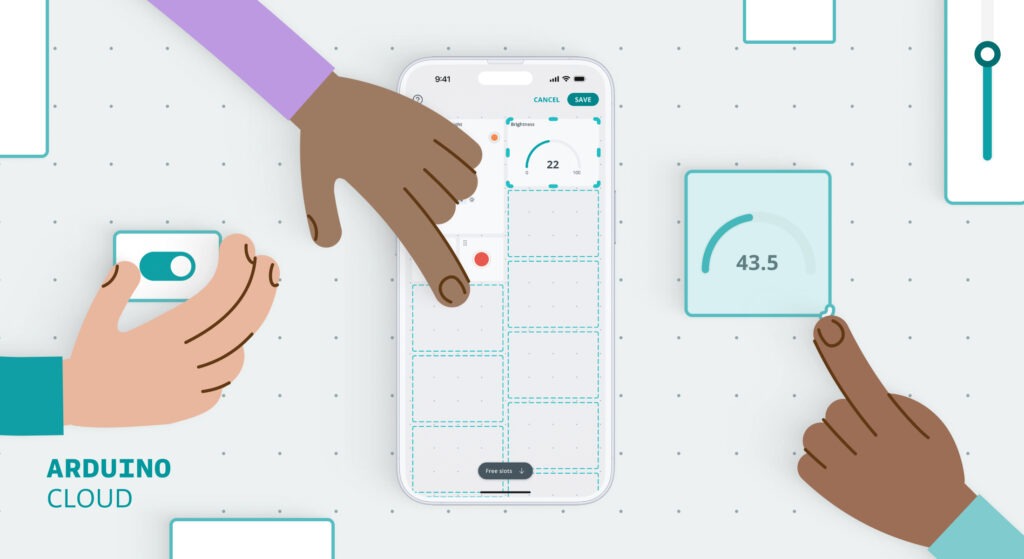
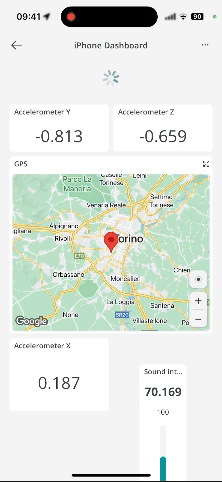
The Arduino Cloud has long been a trusted platform for makers, engineers, and developers to manage their IoT projects with ease. From tracking sensor data to automating smart devices, the cloud enables seamless connectivity. Complementing this, the Arduino IoT Remote mobile app gives users the power to monitor and interact with their dashboards from anywhere. […]
The Arduino Cloud has long been a trusted platform for makers, engineers, and developers to manage their IoT projects with ease. From tracking sensor data to automating smart devices, the cloud enables seamless connectivity. Complementing this, the Arduino IoT Remote mobile app gives users the power to monitor and interact with their dashboards from anywhere. Now, we’re excited to announce a new feature that enhances your experience even further: the ability to change dashboard layouts directly through the mobile app!
Let’s dive into this exciting new update, along with some other minor features recently added to improve your experience.
Change your dashboard layouts from the IoT Remote App
Previously, modifying or rearranging the layout of your IoT dashboards was only possible through the browser on a PC. While this worked well for desktop users, it wasn’t convenient for those who needed to make changes on the go. With the latest update, you can now modify the “mobile view” of your dashboard directly through the Arduino IoT Remote app.
It’s important to note that Arduino Cloud dashboards have two distinct views: mobile and desktop. This new feature allows you to customize the layout specifically for your mobile devices, without affecting the desktop version. So whether you’re monitoring your projects on your phone or tablet, you can now optimize the layout for a mobile-friendly experience.
By customizing the mobile view, you gain more control over how your data is displayed and interacted with on your phone—perfect for users who need a quick overview and control of their IoT systems while away from their desktops.
How to use the new layout feature
Using this new feature is simple. Here’s how you can rearrange your dashboard layout in the IoT Remote mobile app:
Open the Arduino IoT Remote app and log into your account.
Navigate to the dashboard you want to modify.
On the Settings menu of the dashboard, tap the Rearrange button.
Select a widget by clicking on it, and move it around the dashboard to the new location or change its size.
Click on CANCEL to discard your changes or on SAVE to save your changes, and your updated layout will be visible across all your mobile devices.
What else is new on the IoT Remote app?
In addition to the layout customization feature, during the past months we’ve introduced several minor updates to make your app experience even smoother:
Sync dashboard cover image: Now, you can set a cover image for your dashboard, and it will automatically sync across all your devices. Whether for branding, personalization, or easy recognition, this feature ensures visual consistency on every device you use.
Disable trigger from Notification Detail: You can now enable or disable a trigger directly from the Notification Detail screen. This feature provides quick control over automated actions, helping you fine-tune your project with minimal hassle.
Clear notifications via the Activity Manage Panel: Keep your notifications organized by clearing them all from the new Activity Manage Panel. This helps you stay focused by removing unnecessary clutter from your feed.
Install the Arduino IoT Remote on your mobile phone
These new features make it easier than ever to stay on top of your IoT projects from anywhere with your mobile phone. Whether you’re monitoring, controlling, or tweaking your dashboard, the Arduino IoT Remote app is the perfect tool for the job, and it’s free!
Ready to experience these new updates? Download the Arduino IoT Remote app today from the App Store or Google Play and take full control of your IoT projects from the convenience of your mobile device.
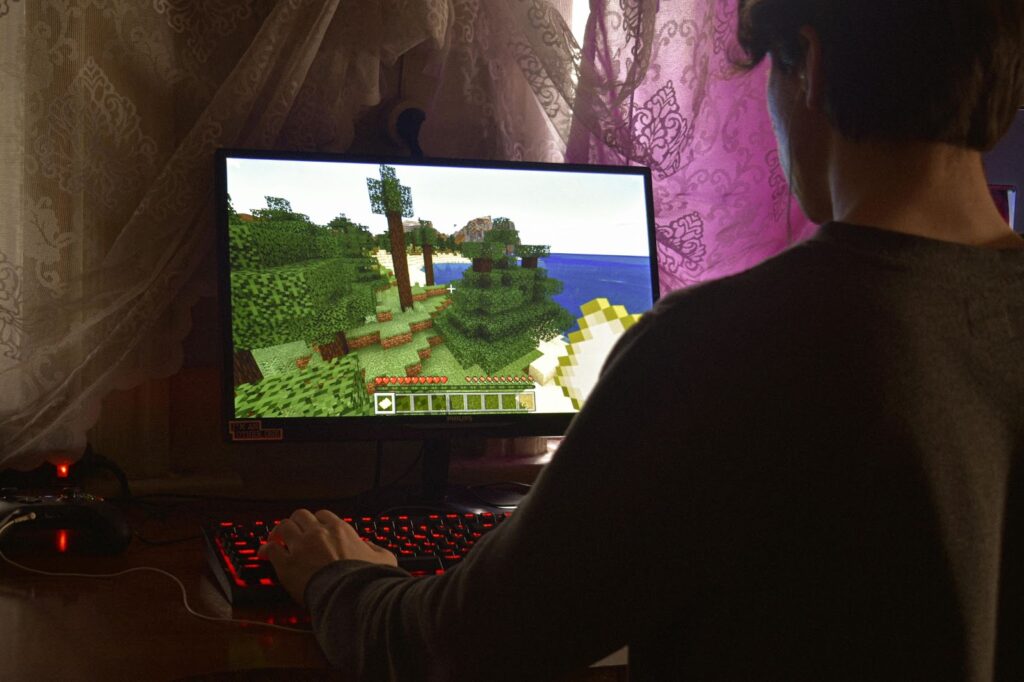
It’s not surprising that the Arduino community is packed to the brim with examples of gaming-related projects. Both activities tend to attract people with a love for problem-solving, technology, and getting immersed in one challenging activity for hours at a time. The result is that there are tons of fascinating Arduino projects that revolve around […]
It’s not surprising that the Arduino community is packed to the brim with examples of gaming-related projects. Both activities tend to attract people with a love for problem-solving, technology, and getting immersed in one challenging activity for hours at a time.
The result is that there are tons of fascinating Arduino projects that revolve around video games. If you enjoy sitting back in your favorite gaming chair and plunging into a world of virtual recreation, you’ll love what we’re sharing here — and maybe you’ll find some inspiration for your next project.
Let’s dive into a few of the best examples of Arduino-driven gaming creations.
Arduino project ideas for gamers
A tiny gaming mouse
The right mouse can make a world of difference in the world of PC gaming — there’s a reason high-end gaming mouses (mice?) can sell for eye-watering amounts of money.
If you want the most finely-tuned, customized mouse possible, though, you’ll have to make it yourself. That’s exactly what Science Shack did with this project — an ultra-light gaming mouse made using Arduino.
Driven by an urge to learn just how tiny a mouse could get, Science Shack embarked on his mission. The result? A mouse that is only 18 cubic centimeters in volume and less than 10 grams in weight.
Check out the full video where Science Shack walks through the process, materials, and the end result.
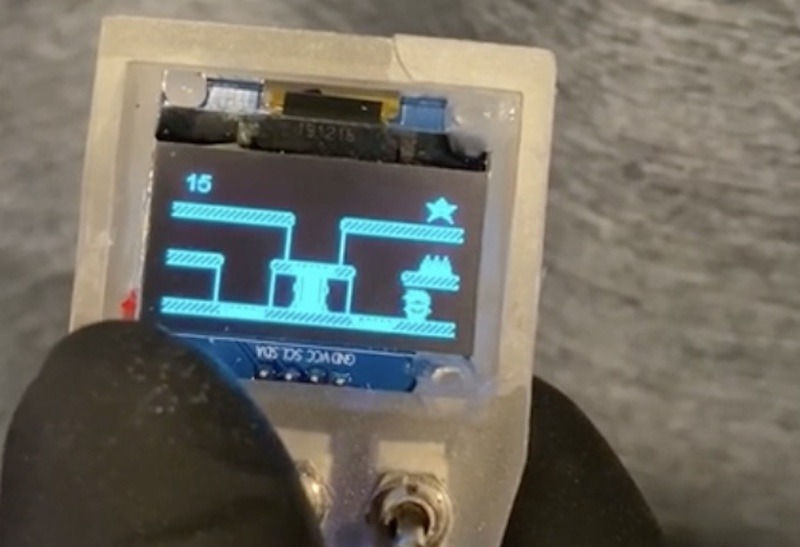
Handheld toggle switches game
When it comes to gaming, more complex isn’t always better. In fact, the old retro-style, ultra-simple games like Space Invaders are still popular decades on.
In keeping with this philosophy, Redditor ToggleBoss decided to create a handheld gaming device operated by nothing more than a small set of toggles. The device features a simple yet satisfying game on a small LED screen.
ToggleBoss’s project was built with just a handful of components — Arduino code running on a NodeMCU, together with a pull-up resistor for switches and an SSD1306 OLED display..
An LED gaming platform for people with special needs
One of the great things about gaming is that it’s an activity that almost anyone can enjoy.
This is now even more true thanks to Alain Mauer, who constructed this LED gaming platform specifically for people with special needs.
Mauer was inspired to create the project to help his son, Scott, who is non-verbal autistic. Later, he realized it could be enjoyed by many more people, including those with movement restrictions.
The game is a simple, LED-based puzzle operated by easy-to-press buttons on the device. There is no time pressure, and the device is extremely robust and durable.
Best of all, the project is designed to be as easy to replicate as possible. It uses affordable and easily obtained components with the code developed using the Arduino IDE 2.
Arcade stacker game
Arcades may be associated with a bygone era, but that doesn’t mean we can’t replicate the same excitement and fun in our own homes.
Reddit user enlightened-creature built this arcade-esque stacker game with a 3D-printed case to capture the arcade vibe from anywhere. It’s built using a simple LED screen and some code and is easy to emulate — as proven here by another Arduino fan.
Exercise bike
In our busy, hustle-filled world, riding a stationary bike at home is one of the most convenient ways to get some exercise — saving the time and effort of hitting a gym or sports club.
But there’s one big problem… it’s boring. Programs like Peloton have evolved to help alleviate the tedium, but they’re expensive and not for everyone.
To solve the problem, Arduino user issaom decided to connect their exercise bike to the PC, transforming it as a controller for various driving simulator games. The pedals are, unsurprisingly, used to move forward, and a steering wheel is attached to the handlebars to change direction.
The project employs several components including an Arduino Nano and an Arduino Micro.
Take your gaming projects to the next level
With Arduino, it’s entirely possible to build projects just like these at home, with nothing more than a few easy-to-find components and some basic code.
The Arduino Project Hub is filled with similar examples, in any category you can think of and for all levels of experience. You can filter by project type and difficulty level, and even search for specific projects — plus there’s a specific section for interactive games. Check it out for inspiration and guidance.
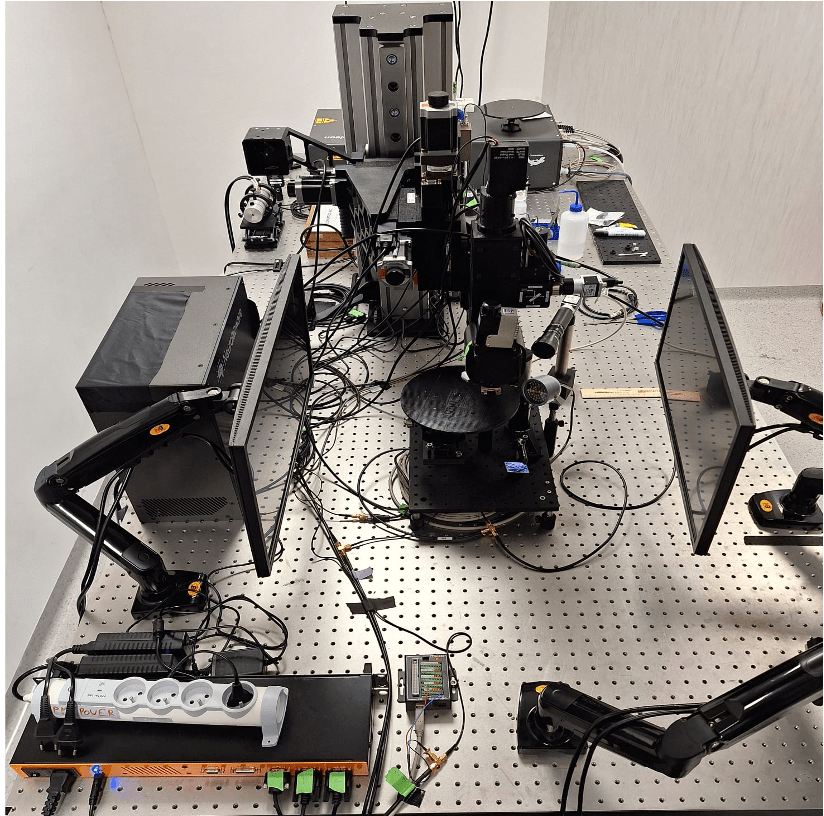
Common research methods to study the visual system in the laboratory include recording and monitoring neural activity in the presence of sensory stimuli, to help scientists study how neurons encode and respond, for example, to specific visual inputs. One of the biggest technical problems in the neural recording setups used in such experiments, is achieving […]
Common research methods to study the visual system in the laboratory include recording and monitoring neural activity in the presence of sensory stimuli, to help scientists study how neurons encode and respond, for example, to specific visual inputs.
One of the biggest technical problems in the neural recording setups used in such experiments, is achieving precise synchronization of multiple devices communicating with each other, including microscopes and screens displaying the stimuli, to accurately map neural responses to the visual events.
For example, in the Rompani Lab, a visual neuroscience laboratory at the European Molecular Biology Laboratory (EMBL) in Rome, the recording system (a two-photon microscope) needs to communicate with the visual stimulation system (composed of two screens) that are used to show visual stimuli while recording neural activity. To synchronize these systems efficiently, they turned to an Arduino UNO Rev3. “Its simplicity, reliability, and ease of integration made it an ideal tool for handling the timing and communication between different devices in the lab,” says Pietro Micheli, PhD student at EMBL Rome.
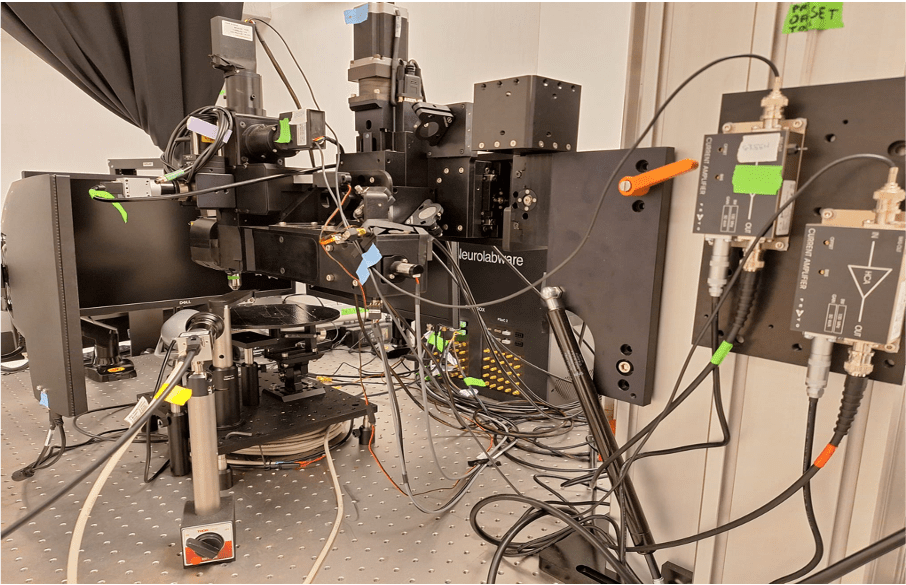
How the setups works
The Arduino UNO Rev3 is used to signal to the microscope when the stimulus (which is basically just a short video) starts and when it ends. While the microscope is recording and acquiring frames, a simple firmware tells the UNO to listen to the data stream on a COM port of the computer used to control the visual stimulation.
Within the Python® script used for controlling the screens, every time a new stimulus starts a command is written on the serial port. The microcontroller reads the command, which can be either ‘H’ or ‘L’, and sets the voltage of the output TTL at pin 9 to 5V or 0V, respectively. This TTL signal goes to the microscope controller, which generates time stamps for the microscope status. These timestamps contain the exact frame numbers of the microscope recording at which the stimulus started (rising edge of the TTL) and ended (falling edge of the TTL).
All this information is essential for the analysis of the recording, as it allows the researchers at EMBL Rome to align the neural responses recorded to the stimulation protocol presented. Once the neural activity is aligned, the downstream analysis can begin, focusing on understanding the deeper brain activity.
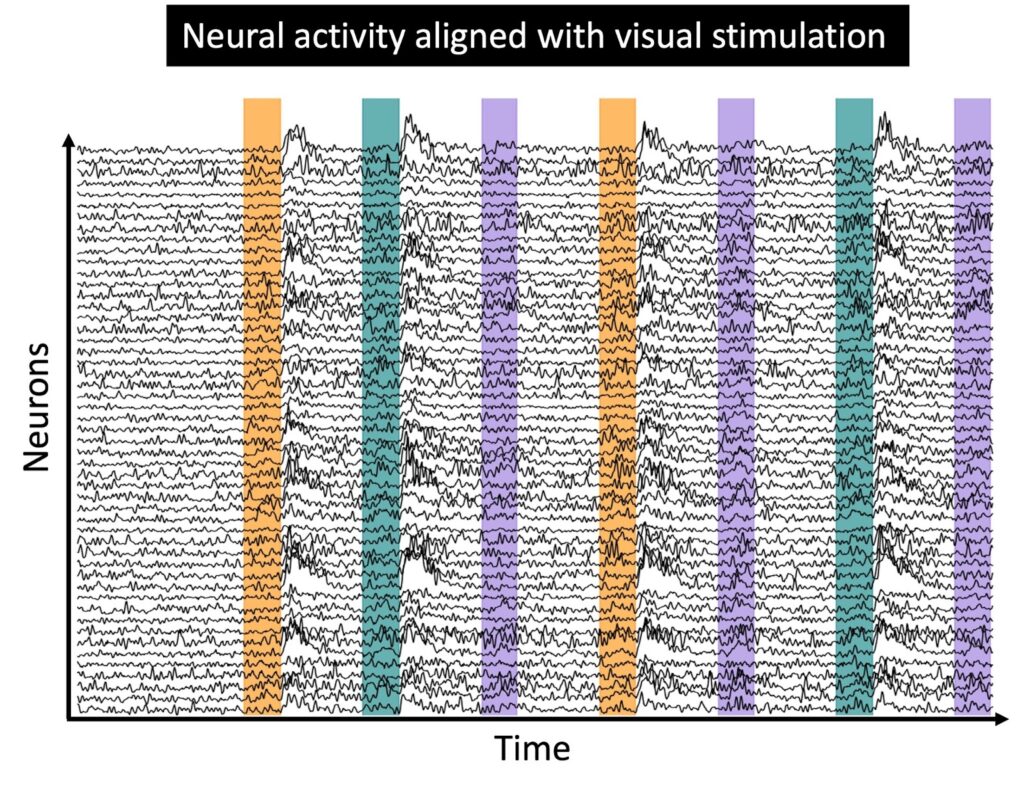
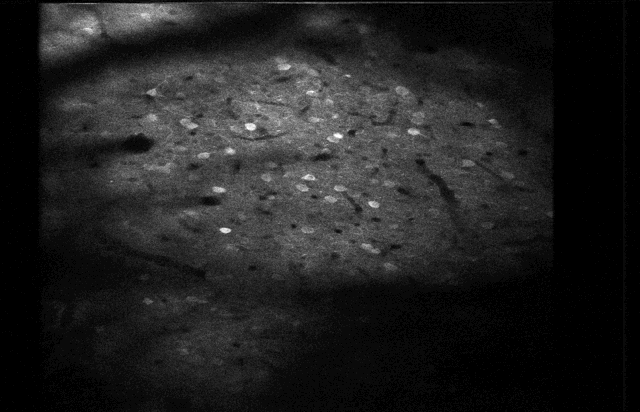
Ever wonder what neurons that are firing look like?
Micheli shared with us an example of the type of neural activity acquired during an experimental session with the setup described above.
The small blinking dots are individual neurons recorded from the visual cortex of an awake, behaving mouse. The signal being monitored is the fluorescence of a particular protein produced by neurons, which indicates their activity level. After the light emitted by the neurons has been recorded and digitised, researchers extract fluorescence traces for each neuron. At this point, they can proceed with the analysis of the neural activity, to try to understand how the visual stimuli shown are actually encoded by the recorded neural population.
Since the inception of Arduino, the Arduino IDE has been a go-to tool for people learning to code and creating projects ranging from remote-controlled cars to soil moisture monitoring. No wonder it’s been downloaded over 24 million times this year, so far! Now if you’ve ever wondered whether you can use Arduino IDE online, you’re […]
Since the inception of Arduino, the Arduino IDE has been a go-to tool for people learning to code and creating projects ranging from remote-controlled cars to soil moisture monitoring. No wonder it’s been downloaded over 24 million times this year, so far!
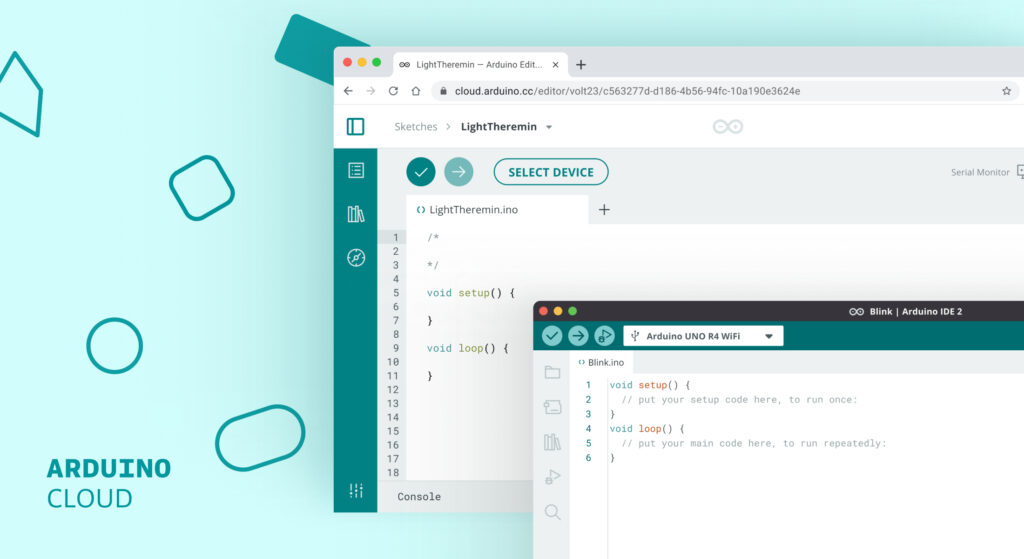
Now if you’ve ever wondered whether you can use Arduino IDE online, you’re not alone. Many Arduino enthusiasts, from hobbyists to professionals, have been asking the same question. The good news? Yes, there is an online Arduino IDE, and it’s called the Arduino Cloud Editor! Available through Arduino Cloud, the Cloud Editor (previously known as the Arduino Web Editor), offers a seamless, free way to code from anywhere without the hassle of traditional software. It gives you peace of mind knowing that there is no risk of losing your valuable sketches – or all the hours you spent developing them.
Both the traditional Arduino IDE and the Cloud Editor have their strengths, but choosing the right one depends on your specific needs and project requirements. So, in this post, we’ll dive into the details so you can make an informed choice and pick the editor that is most suitable for you.
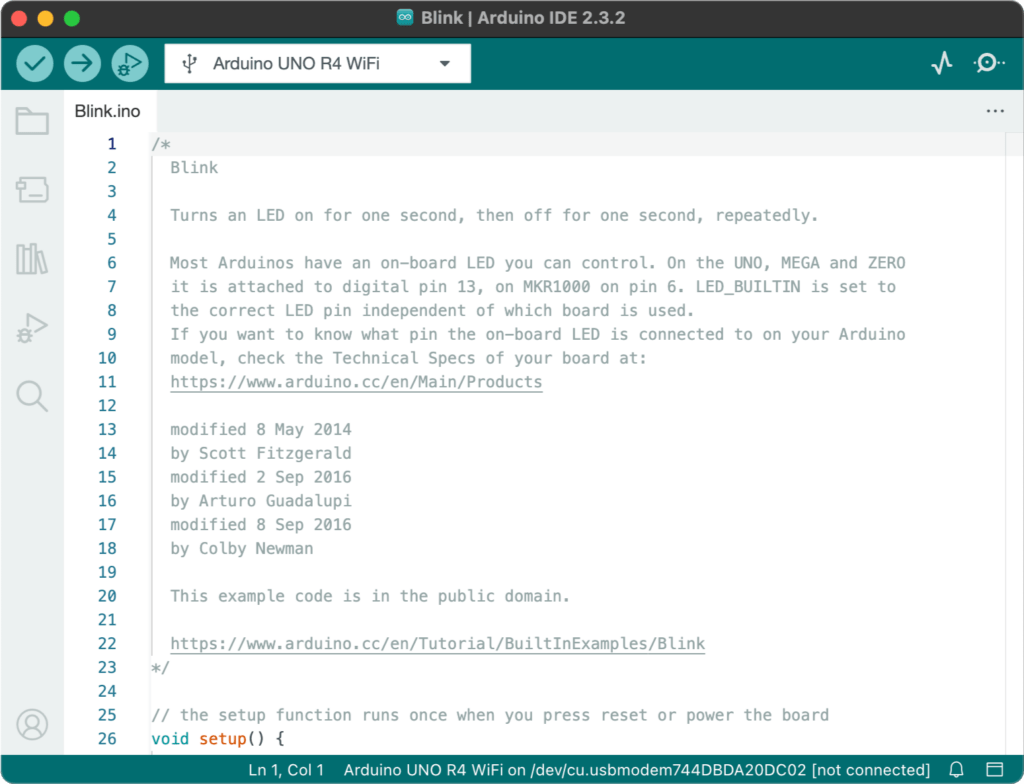
Arduino IDE: greater control, offline use, and stability
Screenshot of the Arduino IDE 2.3.2
The traditional Arduino IDE is installed on your computer, allowing you to write and upload code directly to your Arduino board via a USB cable. Once installed, the IDE can be used offline, making it a reliable choice for projects in areas with limited or no internet access, for example while camping or in remote work locations.
It gives you complete control over updates, letting you maintain a stable environment by choosing when (or if) to install the latest changes. Plus, it’s equipped with a robust debugger, a serial monitor, and access to thousands of libraries contributed by the Arduino community.
Key features of the desktop IDE include:
Serial Monitor & Serial Plotter: Essential tools for debugging and visualizing data.
Library Manager: Access to over 5,000 libraries created by the Arduino community.
Autocompletion: The easiest way to speed up your coding process.
In short, the traditional IDE offers more control, such as the option to manually update or freeze the version you’re using, and requires only occasional internet connection for updates.
Who can benefit from the Arduino IDE? Teachers and users who prefer a stable environment without frequent changes may find it particularly valuable.
Arduino Cloud Editor: a convenient Arduino IDE online experience
The Arduino Cloud Editor offers a similar experience to the traditional version but adds the convenience of cloud storage and extra features.
One of its most appealing benefits is accessibility: you can access your projects from any computer, whether you’re at school, at home, or at work. Actually, you can even have them in your backpocket on your smartphone when you’re on the go! Cloud auto saving also ensures you never lose progress due to technical issues, providing a safeguard for your projects.
The Cloud Editor automatically updates itself as well as pre-installed libraries, saving you from manual maintenance. Real-time collaborative coding is another standout feature, enabling teams and students to work together on sketches seamlessly.
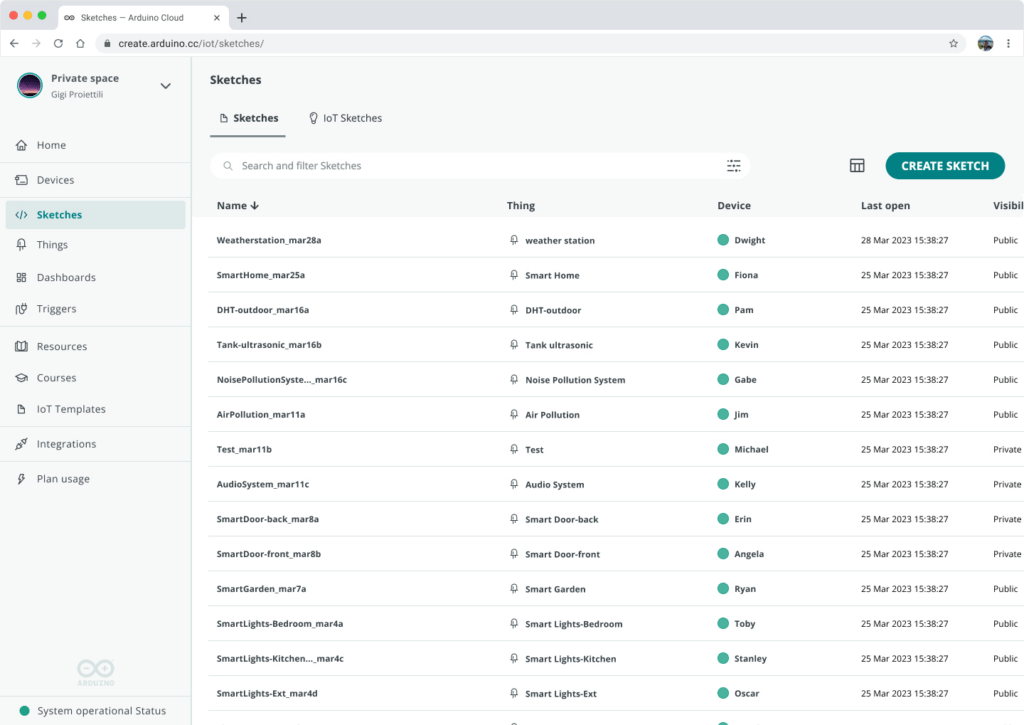
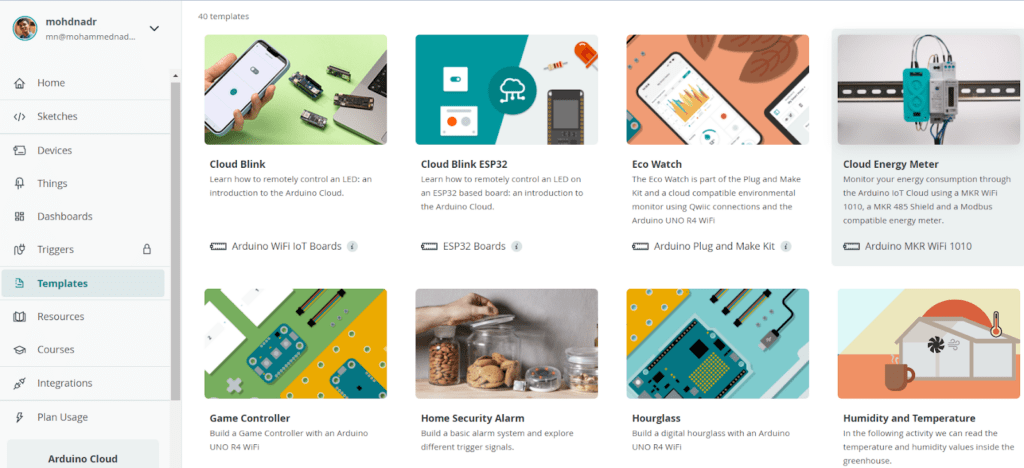
The Cloud Editor is available through Arduino Cloud, a full integrated development experience. In other words, it’s part of a bigger ecosystem. You can build IoT projects faster with pre-built templates, customize dashboards to monitor and control your devices remotely, and even integrate voice commands via Alexa or Google Home without writing a single line of code.
Screenshot of the templates section in Arduino Cloud
Who can benefit from the Cloud Editor? Anyone who needs real-time collaboration and easy access to their projects from anywhere.
The traditional Arduino IDE is ideal for users who need offline access and greater control over updates. It’s faster when compiling and uploading code, and offers advanced debugging tools that the Cloud Editor lacks.
On the other hand, if you need flexibility to work from multiple locations or collaborate in real-time, the Arduino Cloud Editor’s seamless integration with cloud storage and automatic updates make it a more convenient option, especially for beginners. Features like OTA updates are particularly useful for projects requiring frequent, remote updates.
As a quick summary:
Choose the traditional Arduino IDE if:
You prefer working offline or in remote locations without internet access.
You want full control over when updates are installed.
You’re using non-Arduino hardware that requires specific libraries or configurations.
Choose the Arduino Cloud Editor if:
You want to access and edit your projects from anywhere, on any device.
You appreciate automatic updates and zero maintenance.
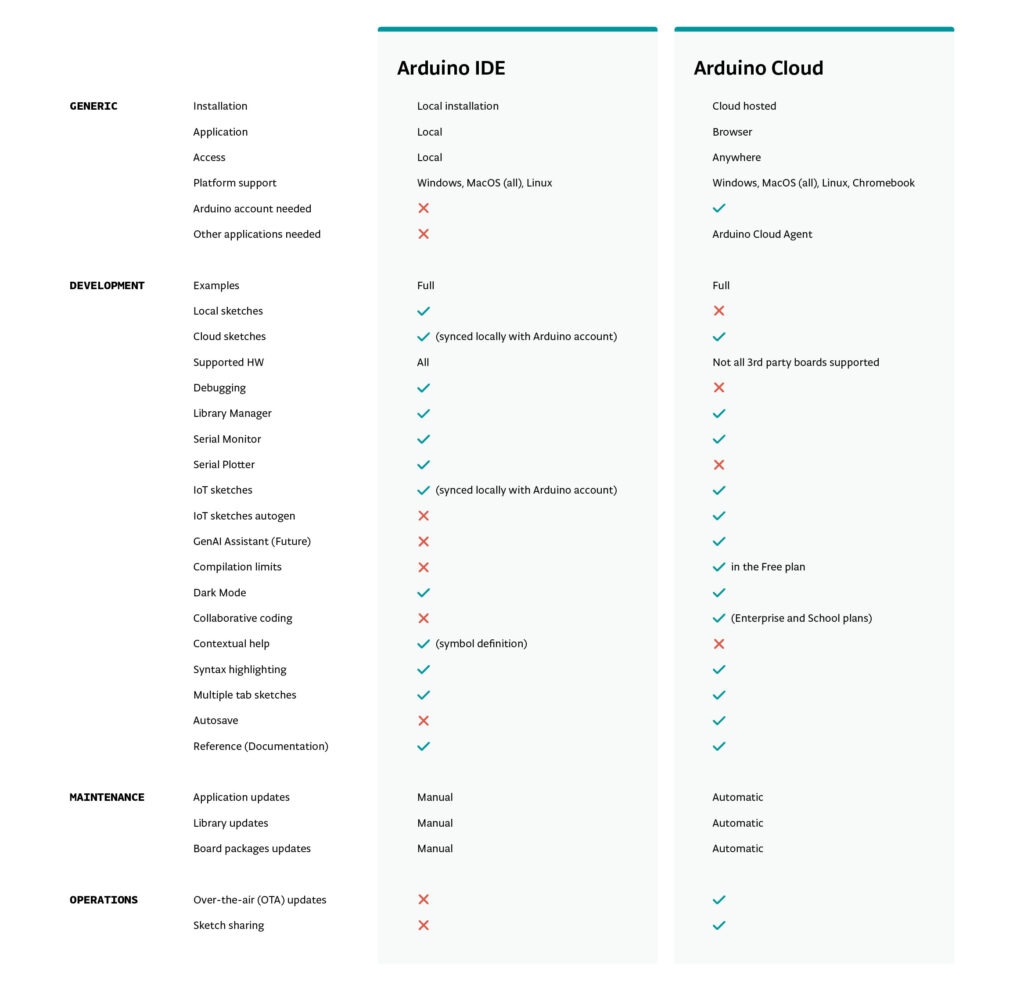
We’ve summarized the features available in the two editors in the detailed comparison table below, to help you decide which option best suits your project needs.
Ultimately, your choice should reflect your project’s complexity, collaboration needs, and hardware requirements.
How to get started with the IDE of your choice
Having decided which IDE is best for you, are you now ready to dive in?
To get started with the traditional Arduino IDE, download the software and check out the Arduino Docs guide that shows you how to program using the IDE.
For the Cloud Editor, simply create an Arduino account and explore the detailed Cloud documentation to help you bring your dream project ideas to life!